Last updated on September 6th, 2017 at 06:48 pm
 Are you ready to practice yoga, but don’t know where to start?
Here are some of the top poses I recommend to beginners as a yoga guide.
You guys might already know that we recently went through a yoga themed month with the addition of The Jedi Path into The Superhero Academy – and now we’re taking it to the next level!
And as your guide, I do need to remind you to discuss if yoga is appropriate for you with your doctor IF you have any physical impairments or limitations that could send you on your way to the ER if you aren’t too careful. Please listen to your body, stop what you’re doing immediately if something becomes painful or hurts, and practice them at your own pace. This isn’t a routine or prescription; these are all individual poses you can try out on your own free time away from class.
Wear loose, comfortable clothing, clear the room to allow yourself enough space to practice, and if you can, try to distance yourself from any distractions such as the T.V. or your phone. Bonus points too if you can view yourself in front of a mirror! As for a mat, you want something that doesn’t slip, with good grip, as well as some level of cushion so it doesn’t feel like you’re jamming your limbs into the floor.
With all of that out of the way, let’s begin!
- Forward Fold
Also Known As: Standing Forward Bend
Sanskrit Name: Uttanasana
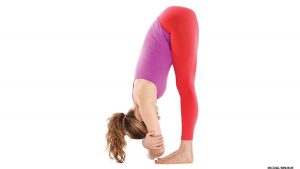
Step One: Start standing, feet hip width apart. Spine is long, chest open, shoulders rolled down and back. Arms by your side.
Step Two: Inhale, arms rising up. On an exhale, hinge from the hips, and bend forward.
Note: Please keep your knees bent during this step. As your begin to open up your legs with a steady practice, you’ll be able to reach down with straight legs. Intermediate and Advanced yogis may also consider bending their knees during warm up.
Step Three: Pull the belly in to protect the low back, and let your hang loose like a rag doll. Loosen up any tension in your neck, and imagine your body falling like a heavy weight into the bottom of a deep pool. Sink into the pose.
Step Four: Knees still bent, belly in, begin to slowly roll up vertebrae by vertebrae. At the very top give a deep inhale in, and bring your arms up above you. Exhale, arms fall softly by your sides.
- Cat and Cow
Note: These two poses are practiced together, hence the reason why I lumped them into one category. So you get a two-for-one bonus here! The top image is Cat, and the bottom one is Cow.
Sanskrit Name: Majaryasana (Cat) and Bitilasana (Cow)
Prep: If you have sensitive wrists and/or knees, feel free to either double up your mat, use a rolled towel/blanket, or a soft pillow/cushion. Down on the floor, you’re going to begin with your hands underneath your shoulders, and your knees underneath your hips. Neck is in a straight line with your spine.
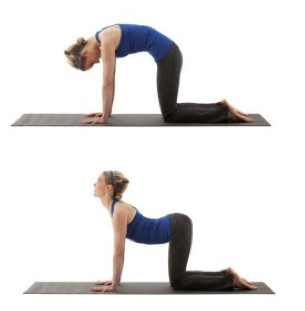
Step One: (Cat) Exhaling, create a “dome” with your back as you round your spine up to the ceiling, like a Halloween cat on a wooden fence. Pull your belly in as you keep your tailbone tucked, with your wrists in knees staying in place. Gaze is down on the floor.
Step Two: (Cat) Inhale, letting all of the breath in, come back into the starting position (Prep). Back is flat.
Step Three: (Cow) Inhaling, lift the sit-bones up to the ceiling as you spread open your chest and let your belly drop to the floor. (Avoid trying to “push” or “poof out” the stomach in this position.) You can look up to the ceiling or straight ahead.
Step Four: (Cow) Exhale, letting all of the breath out, come back into the starting position (Prep). Back is flat.
Note: You can now switch between the two poses at your own pace; maybe a longer stay in Cat is in your favor, or Cow deserves more attention. Whichever you decide, be mindful of your spine and try to imagine yourself “swimming” through the poses, flowing gracefully and softly. Try not to jerk yourself between each pose, and force yourself into them. When combined, they are excellent for synovial fluid circulation in the spine.
- Downward Facing Dog
Also Known As: Downward Dog, Down Dog
Sanskrit Name: Adho Mukha Svanasana
Note: Once again, you may need extra cushioning if you have sensitive wrists. Some beginners also struggle with this pose, so I will include two modifications after explaining the steps for getting into Downward Dog.
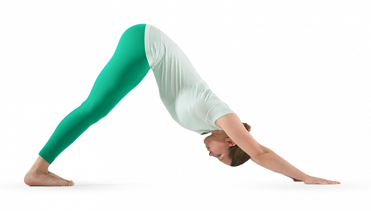
Step One: Starting from your hands and knees, crawl your hands a few inches ahead of your shoulders. Keep them spread wide as if you were digging into wet sand. Upper arms and shoulders are rotated out, and the forearms are turning in.
Step Two: Tuck the toes and push yourself away from the floor, hips lifting up. You are in a triangle, or upside down V.
Note: Beginners may notice that their heels are elevating off of the floor. Overtime, as you become more flexible, you’ll be able to naturally soften them down. It just takes time, so there’s nothing to worry about when you’re just starting out.
Step Three: Give a micro-bend to the knees and begin to lengthen the spine, continuing to drive the hips up, and the knees back. Imagine sliding the shoulder blades back down the spine.
Note: Beginners who are ready to test their flexibility can start to straighten the legs, but only do so if this can be done while also maintaining the length of the spine.
Simply drop the knees to the floor and return to a neutral position with the back flat and hands underneath the shoulders when you ready to come out of the pose.
1st Modification: Downward Dog Against the Wall
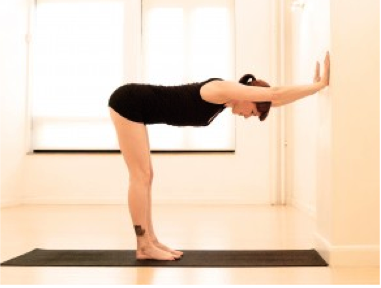
Stand about 2-3 feet in front of a wall, legs hip distance apart. Place your hands on the wall and begin to walk them down until both your chest and arms are parallel to the floor. Instead of a V shape, you’ll be close to making a flat, 90 degree angle. Drive your heels into the floor, and pull the shoulders back. Upper arms are turning out, forearms are turning in. Hips pushing back.
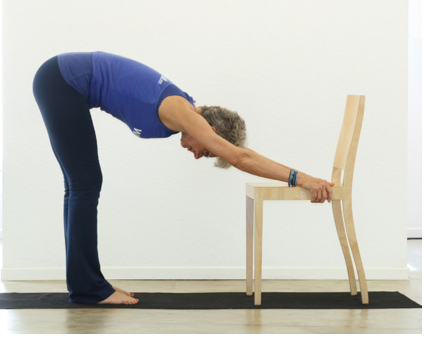
2nd Modification: Downward Dog Using a Chair
Find a chair, and place the back of it against a wall for support. (Don’t use any office or rocking chairs to avoid slipping out or dealing with an instable surface.)
Stand about 2-3 feet away from the chair with your feet hip distance apart. Give a slight bend to the knees and hinge forward from the hips as you place your hands on either in front or on the sides of the chair. Walk a few steps back until you’ve created a V shape. Drive the heels into the floor, and pull the shoulders back. Upper arms are turning out, forearms are turning in. Hips pushing back.
- Dolphin Pose
Sanskrit: Forearm Adho Mukha Svanasana
Note: Some may consider this to be a cop-out, but hear me out. I’ve noticed that this pose benefits both beginners and intermediate to advanced yogis. Many people I’ve taught often prefer Dolphin to Down Dog because it’s easier for them to rest their heels on the mat as well as support themselves with the use of the forearms. Others whom I have taught prefer it for an extra challenge because it’s also good for opening and activating the shoulders. Hence the different benefits!
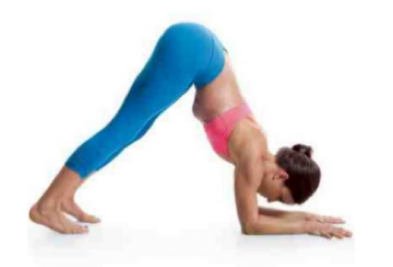
Step One: Starting on hands and knees, place your forearms on the mat, keeping the shoulders above the elbows. From here, you can either press the palms of the hands together with the fingers interlaced, or you can keep the forearms flat and the palms pressing down into the mat at shoulder width.
Step Two: Tuck the toes underneath and lift the knees up. Begin to find length in the spine as you extend the legs and shift the hips up towards the ceiling.
Note: If your heels still don’t touch the floor, don’t fret; it’s all a matter of flexibility, which comes naturally over consistent practice. I can’t tell you when the moment will arrive when they do manage to naturally fall into the floor, but I do know that it will happen eventually. Don’t give up!
Step Three: Actively engage the forearms as you press them into the mat. Draw the shoulder blades back and tuck the tailbone down. Keep your head above the mat.
Note: If you find yourself arching your back in this pose, give a small bend to the knees. To get out, drop the knees to floor.
- Low Lunge
Also Known As: Dragon Pose
Sanskrit: Anjaneyasana
Note: If your knees are sensitive, double up the mat, use a towel/blanket, or a cushion/pillow underneath it. You can also use a pair of yoga blocks to rest your hands on when you get into the pose. This helps you to focus more on stretching the front of the thigh.
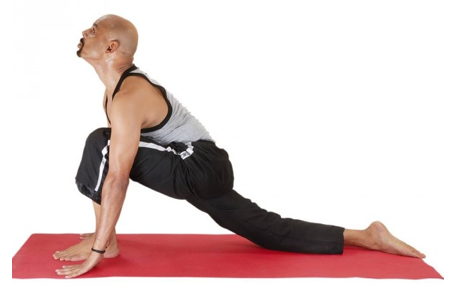
Step One: Starting on hands and knees, bring your right foot to your right thumb. The left leg extends straight behind you, the left knee lowered to the floor. Hands stay on the mat.
Step Two: Tailbone tucked. Lower belly pulls in. Slide the left foot back until you start to feel a stretch in the left hip flexor and thigh. Both sides of the hips remain low and even to each other.
Step Three: You can keep your hands on the mat, or, you can place them above the right knee in front of you. Start to shift ½ to 1 inch forward, feeling the stretch in the hips. You choose to either tuck the toes or flatten the top of the foot down on the mat.
Step Four: Lower your hands back down, and return the front leg back to the starting position, both hands and knees down on the mat.
- Sphinx
Sanskrit: Salamba Bhujangasana
Note: This pose helps to develop awareness towards upper back strength, and is a great prelude towards Cobra and Upward Facing Dog. Many beginning students prefer Sphinx to Cobra, thanks to the support of the forearms on the mat. Feel free to use a towel/blanket or pillow/cushion if your wrists and knees are sensitive.
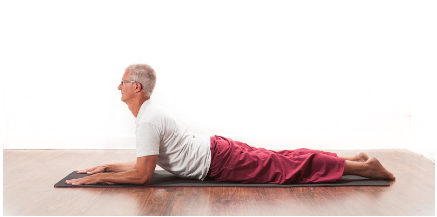
Step One: Start lying on your stomach, legs straight behind you and your feet just about hip width apart.
Step Two: Bring yourself up to your forearms, palms facing flat on the mat, and line up both elbows right underneath your shoulders (you can also creep them a few inches above shoulder level if that is more comfortable).
Step Three: Reach your chest forward, spreading the collarbones wide. Your head is gently lifted up and supported by a long, even neck. Look ahead out in front of you.
Step Four: Pull the shoulders and arms slightly back, drawing the shoulder blades down your spine. Softly press the tops of the feet to the mat to support yourself. Pulling up the soft, top part of the knees provides additional stability.
Note: As you hold this pose, continue to engage your upper back, pulling your belly in to engage your core and protect the lower back. Avoid hunching forward.
To get out of the pose, lower your chest down onto the mat and relax your arms down by your sides. You can also turn your head from side to side, or fold your arms out in front of you and use them as a cushion for your forehead.
- Cobra
Sanskrit: Bhujangasana
Note: It helps to have started in Sphinx or practiced it a few times before trying Cobra. Doing so enables you to get a sense of how to engage your back muscles and practice the pose without rounding your shoulders up to your ears. I’ve noticed many beginner students jump into this pose without first knowing how to do any of these prerequisites, and end up straining themselves in the process. Please practice gently, never forcing yourself into the shape of the pose. No extra points for looking good or thinking that you’re advancing by going on to the next stage of a pose! Feel free to double up the mat or use a towel/blanket or cushion/pillow if you have sensitive wrists and knees.
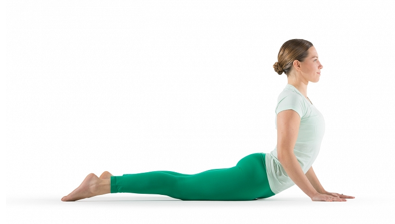
Step One: Begin on your stomach, legs elongated back behind you with the toes pointed straight back. Place your hands underneath the shoulders, hugging the elbows in close to the body. Forehead is resting down on the floor.
Step Two: Pull the belly in, and start to lift from the upper back, opening the chest. Draw the shoulder blades down along the spine. Elbows pointing back; never out to the sides. Extend out through the crown of the head all the way down the spine to the tips of the toes, heels pointing up.
Step Three: Roll the shoulders back, keeping them away from the ears (i.e., avoid hunching forward!). Create length with your neck, and feel a gentle but open stretch through the entirety of the spine. Ribs draw slightly forward.
Note: The strength of this pose mainly comes from your upper back, and a little from your chest. Your hands should not be doing all of the work here. To test your back strength, lower back down to your stomach, and try to see if you can lift yourself up without the use of your hands. Ideally, you should feel the strength coming only from your back muscles here.
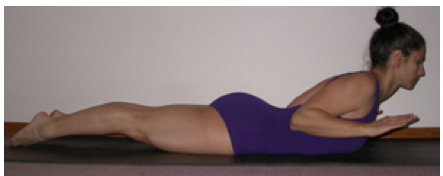
After holding yourself up for a second or two, lower down again, and lift back up into Cobra, remembering the strength of your back muscles that were worked in the test I described. If you find yourself relying on the strength of your hands during Cobra, return to practicing in Sphinx and working on strengthening your back muscles before attempting Cobra again.
To come out of the pose, lower yourself down to your stomach and bring your arms down by your sides. You can also turn your head from side to side, or fold your arms out in front of you and use them as a cushion for your forehead.
- Child’s Pose
Sanskrit: Balasana
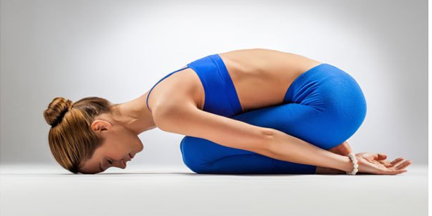
Step One: Come down onto the mat on all fours.
Option A: Take the knees out as wide as the mat; beginning students, or those with sensitive backs, a larger belly or breasts, often find this option the most comfortable. Heels pointing straight up.
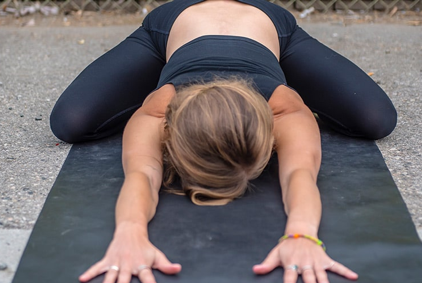
Option B: Spread both knees hip-width apart. Big toes come together, heels pointing straight up.
For the Feet:
Option A: Toes tuck behind you.
Option B: Toes spread out, tops of the feet flat on the mat.
Step Two: Shift back, bringing your buttocks down towards the heels. Belly rests in between the thighs. Elongate your spine, inhaling, and exhaling; breathing into the base of the skull and down along the length of the entire back.
Step Three:
Option A: Lay your arms back behind you, palms facing up.
Option B: Reach your arms up in front of you, palms placed flat onto the mat.
Forehead rests softly on the mat. Widen across the shoulder blades.
Note: If you cannot bring your forehead down onto the mat, cross your forearms out in front of you and use it for support. You can also rest it on either a pillow/cushion or folded towel/blanket.
To come out of the pose, start to lengthen the front of the torso. Next, lift the tailbone and hips up and sit up onto your heels.
- Bound Angle Pose
Also Known As: Butterfly Pose, Groin Stretch
Sanskrit: Baddha Konasana
Note: You may want to sit on a soft, semi-elevated surface when practicing this pose. You can double-up the mat or use a folded towel/blanket or cushion/pillow. This is good if your hips or tailbone is sensitive. The goal here is to sit with a straight back.
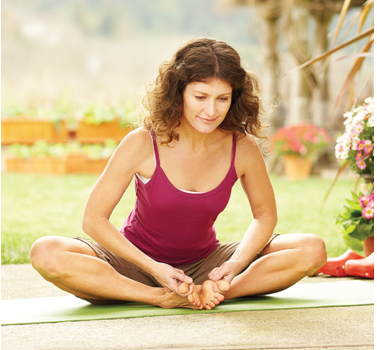
Step One: Start at an easy seated position on the mat. Bring both feet in, soles touching. Bring them close to your pelvis and let your knees fall out to your sides.
If your knees are pointing up above hip level, this is an indication that you have very tight hips, and may need to sit on an elevated prop (use one of the options I give in the Note above).
Otherwise, allow gravity to do the work as they naturally start to lower down closer to the mat. Avoid forcefully pushing them down.
Step Two:
Option A: With the first two fingers and your thumb on each hand, hold the big toes.
Option B: Hold the outside edges of your feet.
Inhale, lengthen the spine, and reach out, tailbone anchored in place. The pelvis is level, and your back is straight. Keep the chest open, and drop the shoulder blades down into the back.
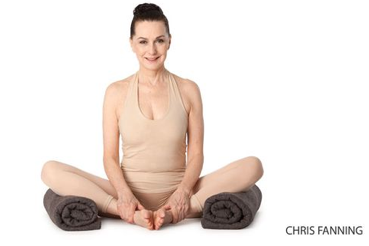
Step Three: Breathe into your hips, and avoid rounding the back. Your upper body is reaching out ahead in a straight line of energy, and your lower body is staying grounded onto the mat in an opposite line of energy. Engage your core to protect the lower back.
Note: If your ankles are sore, you can move them a few inches away from the groin. If your inner thighs or groin is feeling some strain, you can place either a folded towel/blanket or cushion/pillow underneath them. Another option is to place a yoga block or two (if you have any) out in front of you, and prop both feet on top.
To come out of the pose, lift the knees up and extend the legs straight out in front of you.
- Bridge Pose
Sanskrit: Setu Bandha Sarvangasana
Note: If your mat is very thin or doesn’t provide a lot of cushion, you can practice this pose by layering another mat or a towel/blanket on top for support. If you have any neck problems or injuries, DO NOT perform this pose without professional supervision!
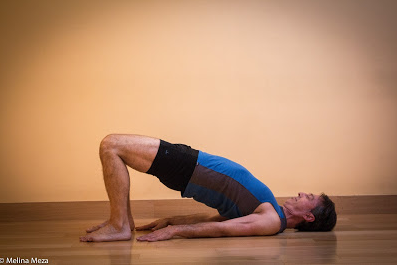
Step One: Lie down on the mat. Lengthen the arms down at your sides, palms facing down.
Step Two: Bend the knees, feet flat on the floor and parallel at hip distance apart, heels close to the buttocks.
Step Three: Tuck the belly in as you press the upper arms and inner and outer edges of the feet into the mat. Lift the hips up as high as they’ll go, chin tilting down towards the breastbone, but lifting slightly up.
Step Four: Actively engage the core to protect the lower back. Keep the knees pointing directly ahead, and avoid spilling them out to the sides. They should also be straight above the ankles. The glutes are engaged, but not clenched. Shoulder blades draw down the spine.
Option: You can “tuck” or “roll” each shoulder down and lift ½-1 inch higher. Another option is to clasp both hands behind the back and further press the arms into the mat. This creates more stability with the added benefit of stretching out the shoulders.
To come out of the pose, continue to pull the belly in to save the lower back. Release the arms and slowly lower down vertebrae by vertebrae until the hips land softly onto the mat.
Note: It’s never a good idea to jump out of this pose once you’re done with it. You run the risk of aggravating the back or worse, injuring it. Instead, you want to first keep a flat back pressed into the mat. Find your breath, and breathe into the lower region of your back.
Option A: Scoot the feet out to either side of the mat, and bring the knees in together. This helps to release the lower back.
Option B: Knees coming together, bring them into your chest and give them a gentle squeeze. You can engage your core and round your back as you bring your forehead towards your knees.
Option C: Perform gentle twists. You can bring one knee in and twist to the opposite side with the opposite leg extending straight out. Or, you can bring both knees in and twist slowly side to side.
As a back bending aficionado, I always perform one or combination of these Options whenever getting out of bridge or an extreme backbend. No if’s, and’s, or butt’s! I want to save my back, not hurt it!
- Chair Pose
Also Known As: Powerful Pose, Fierce Pose
Sanskrit: Utkatasana
Note: A lot of students HATE this pose, no matter the level of experience. The longer you remain in the pose, the harder it becomes. Therefore, I recommend you focus on your breath, not only as a means of distraction but also to help calm and center the mind.
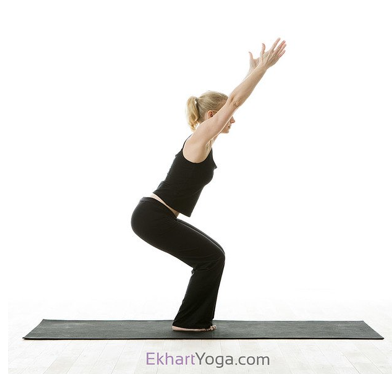
Step One: Begin in a standing position, feet together or hip-width apart; your choice.
Step Two: Reach the arms up and bend the knees and sink down as if you’re about to sit in a chair. Thighs come as close as they can to parallel with the floor.
Step Three: Make sure the knees never reach past the toes (you should still be able to see them), sending the hips back. Lean the torso slightly forward with a flat back. Avoid rounding or hunching it forward. Roll the shoulders back.
Option: If it hurts to extend or keep the arms up, you can widen them out into a V shape, let them fall by your hands, or bring your hands in front of your chest in a prayer-like position, palms pressing together.
Step Four: Pull the belly in to protect the lower back, and lengthen your neck. Your gaze is either down onto the floor or softly out in front of you. Keep both fleet flat on mat, with your weight distributing evenly between the heels and balls of the feet. This keeps you grounded while also providing some lift for the upper body.
To come out of the pose, straighten the legs, and bring your arms down by your sides.
And there you have it! My Top 11 Yoga Poses for Beginners! I hope these become your gateway towards practicing a full routine either at home or in a studio. As always, be mindful of your body, never pushing or straining within each pose. Find what works best for you, and make the practice your own.
Take care!
– Sam, aka, The Dragon
SUPERHUMAN SECRETS V.2
NOW UPDATED AND EXPANDED WITH A NEW SECTION & SEVEN BONUSES
USD$29 USD$14.95

